Whether you’re just starting an ecommerce business or considering a rebrand, one of the most…
Four ways to make managing your store’s updates easier

One of the most common things we hear from customers contacting us for support is that you really, really hate updating your store. We get it. It’s not fun. It’s kind of nerve-wracking, right? You don’t always know what things are going to look like on the other side of the update >>
But updating WooCommerce, its extensions, and WordPress itself doesn’t have to be a pain in the you-know-where. It might never be a pleasant experience, but if you know how to handle it, you can all but eliminate those “my product pages look weird” and “this plugin isn’t working right” experiences.
Today we’re going to show you four ways to better manage updates to your WooCommerce store, and how handling updates in these ways can save you time, keep your store running smoothly, and completely eliminate the pounding headache you seem to get every time you see the phrase “an update is available” in your WordPress dashboard.
Set aside some time for handling updates
One of the best tips we can offer for wrangling plugin, extension, or core WooCommerce updates — and have offered before — is to set aside time on a regular basis that you can devote to this process >>
Depending on the size of your store, how many add-ons you have installed, and the amount of testing you need to do, this may look like an hour every two weeks. Or it may look like a few hours or even a full day once per month.
The idea is to put something on your calendar in advance so that you make updates a priority, keep making them a priority, and don’t forget about them. Also, if you do it this way, you’re a lot less likely to run into issues because the new plugin you insisted on using required the latest version of something you hadn’t made time to test yet.

It may feel silly at first, but go ahead and set up a recurring calendar appointment for your updates, and do your best to only handle them (plus your testing process) at that time. Trust us — you’ll find it’s helpful no matter who you are or how many extensions you have.
Plan ahead with a staging site and backups
 But you don’t have to let conflicts between extensions cause downtime or other issues with your store. If you plan ahead by testing your updates on a staging site, you’ll know what needs corrected without causing any harm to your store.
Creating a staging site — basically a duplicate version of your live store that you use solely for testing — sounds complicated. But it’s actually pretty simple if you’re using Jetpack to back up your data.
To create a staging site with Jetpack via VaultPress:
- Make sure automatic backups are set up with VaultPress first — you’ll need them to update your staging site in the future.
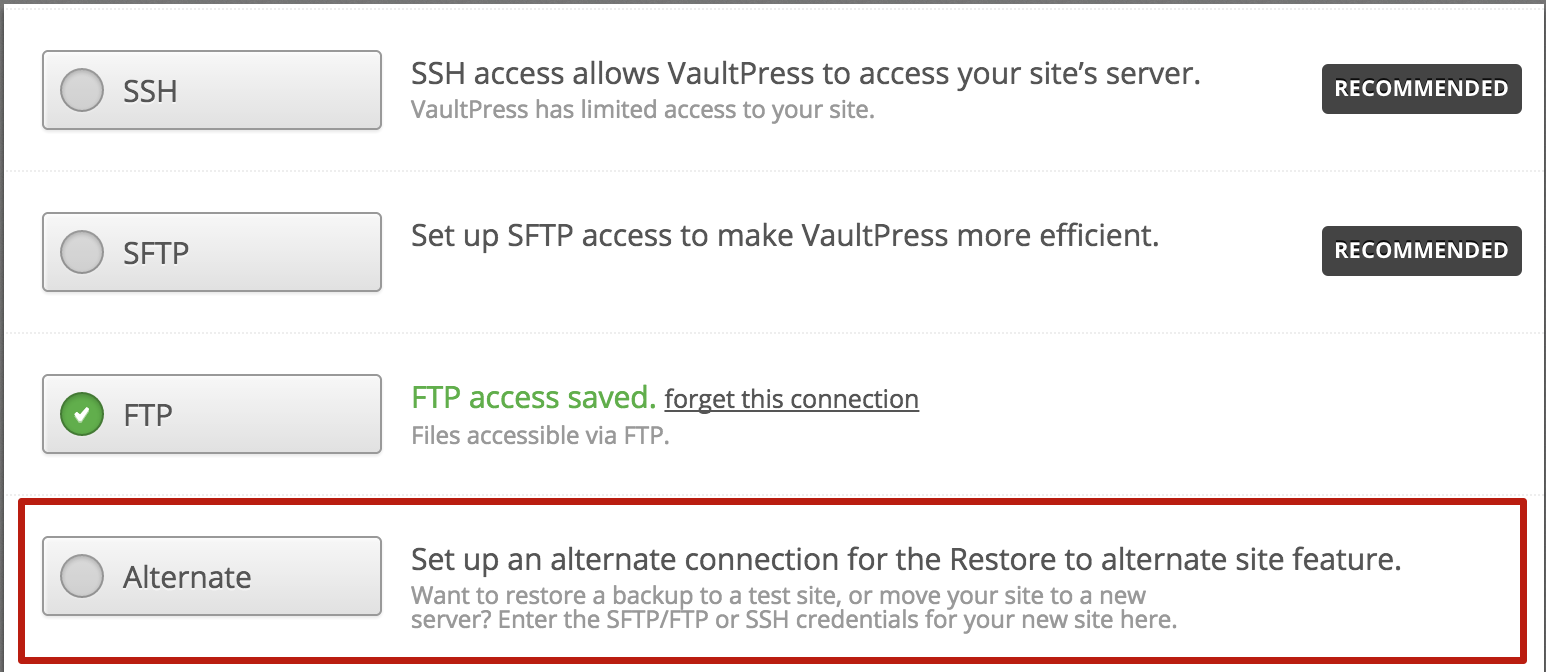
- Create a second site/directory on your server. This doesn’t need to be publicly accessible, but must be accessible via FTP/SFTP.
- Using VaultPress, set your second site as an “alternate” location, then copy your most recent backup (or an on demand copy) to it.
That’s it — you now have a staging site! All of your products, add-ons, and orders will be in place and you can apply and test any updates in the same environment.
The next time you want to test on your staging site, you’ll need to repeat the second half of step #3 to ensure it has fresh/accurate data (and the most recent copies of your extensions) before proceeding with any tests.
Read more about how to set up updates and restore backups to a staging site with Jetpack.
Test everything before going live
Now that you know how to create a staging site, we can share with you the third way to keep updates from running your life: test everything before updating.
One of the biggest reasons that updates seem to take so long or cause so many problems is because we want to update immediately. We see a notice about a plugin update and want to do nothing but click the shiny button and see what’s new and exciting, and we want to do it now.
Our lack of patience is what causes strange-looking themes, bugs in custom code, and sometimes entirely broken sites. But it doesn’t have to be this way.

If you’re already putting time aside for your updates and using a staging site, this step should follow naturally. Apply any new plugin or extension updates one-by-one on your test site (or at least while your store is temporarily closed via a maintenance mode plugin). Go through your store carefully and test:
- The functionality of its design/layout
- Usability of products (including variations, prices, and ability to add to cart)
- Ability to complete all steps of checkout
- Any products/pages with custom code or significant changes made to themes, extensions, plugins, etc.
If the update passes the test, it can be applied to the live site. If not, you’ll need to solve the problem before updating your real store (or, if you’re not using staging, roll back to your most recent backup).
This may seem like a lot, but a little testing will save you a ton of hassle when you spot a potential issue before it surfaces on your store… and potentially costs you both time and money.

Enable — or disable — automatic updates
One thing we haven’t yet talked about is the fact that WordPress (the open source platform that powers WooCommerce) can and will update itself.
As of version 3.7, WordPress will automatically update when maintenance or security releases are made available. It won’t, however, automatically auto-update when a major version is out, nor will it update your plugins or themes for you.
But if you wanted to automatically update everything, you could — say, to save yourself the hassle of restoring another huge chunk of files and data your staging site every time you want to test.
Kinsta has a great post containing some code you can use for this. A few lines added into your wp-config.php file will let you enable or disable several types of automatic updates performed by WordPress. Also, Jetpack can enable auto-updates for all of your plugins if you want.
You may also want to check with your host to see if they perform automatic updates — many managed WordPress hosts do. There is usually a setting to toggle this off yourself. However, be careful disabling automatic security updates for WordPress as doing so could put you at risk for a brute force attack, hack, etc.

Don’t let updates run your store — take control with these tips
We know that updates aren’t fun, especially if they’re major ones. But they don’t have to feel like a waste of your time or cause problems for you.
By using resources auto-updates, a staging site, and backups, plus doing adequate testing, you can take back control of the update process. And if you set aside time to do this instead of trying to get it all done on the fly, you’ll feel less rushed — and more confident that you have a solid, stable store.
We hope this advice has helped you in some way.
[wpseo_map width=”100%” height=”300″ zoom=”-1″ map_style=”roadmap” scrollable=”0″ draggable=”1″ show_route=”0″ show_state=”1″ show_url=”0″] [wpseo_address hide_address=”1″ show_state=”1″ show_country=”1″ show_phone=”1″ show_phone_2=”0″ show_fax=”0″ show_email=”1″ show_url=”1″ show_logo=”0″ show_opening_hours=”1″]Related Articles