Get best WooCommerce Plugins > Instagram stands out among tons of social media platforms as…
How to Create a WordPress Blog or Website in 2020, just like the Pros

So you want to create a great impression with a stunning blog or website. Maybe you got inspired to write an online diary, create a digital resume for potential employers, build a personal brand, or make money by advertising.
No matter what the goal, it has never been easier to build a professional and interactive website or blog. With new advancements in WordPress in recent years, you can now build a slick website fast and cheap, regardless of your skill level.
In this guide, I am going to walk you through the entire process of creating a beautiful and functional website from start to finish. By following the steps outlined below, you’ll finally have an online platform you can be proud of.
So put aside about an hour of your time and let’s get you setup with a professional website in just a few easy steps.
Step 1: Buy A Domain Name
The domain name is the address people will use to access your website online. For example, google.com is a domain name, and so is oceanwp.org.
Without a domain name, there is no way for people to visit your website. So it’s a mandatory part of the website or blog creation process.
Get hundreds of AI-generated business name ideas with matching domain name suggestions:
Use Squadhelp Business Name Generator >
Name Your Business in 3 Easy Steps
If you are short on ideas, tools like Namemesh, Shopify & Namestation can help you brainstorm possible domain names.
A domain name is not something you’re going to change again and again. So it’s wise to put some thought into your decision. Moz has a great guide on picking a good domain name.
Also, it’s better to shortlist more than one domain name idea when you’re in the brainstorming phase. This is because your chosen domain name may not be available at the time of purchase.
Unless you’re buying a really premium domain, a typical domain name will cost you around $10-15 per year.
Once you’re ready with a few ideas, the best way to buy a domain is through a reputed registrar like Namecheap. Just search for your chosen domain name, and if it’s available, add to cart and checkout. It’s that simple.
Step 2: Get High Quality Hosting
What is one of the first steps when you want to open a shop or office offline? You get a commercial space on rent.
Same is the case with your online website or blog. You need to rent storage space on a server that’s online 24 hours a day. This is known as web hosting.
Your hosting will hold all of your website content, text and images in one secure place, and will serve it to anyone who tries to access your domain name.
Depending on the features you get, high quality WordPress hosting from a reputed company can be around $5 a month (Siteground), $10 a month (Cloudways), or $30 per month (Kinsta). Here’s a basic comparison to help you pick from these options.
| Siteground | Cloudways | Kinsta | |
| Pros | Good overall performance Includes SSL certificates Quality customer support Affordable pricing plans | Unlimited websites Automatic site backups Advanced server console Pay as you go pricing | Best overall performance Automatic site backups Expert WordPress support Includes SSL certificates |
| Cons | Limited storage space Limited number of websites | No cPanel to manage sites Requires some tech knowledge | Costlier than other hosts No email hosting |
Don’t worry if some of the pros and cons don’t make sense as of now. To put it simply, SiteGround is the cheapest option with high quality hosting and support.
While the 10 GB storage space and bandwidth you get is less than other hosts, it’s more than enough for your new website. Cloudways has additional features, but can be a bit complicated for beginners. The best of both worlds is Kinsta, which is therefore the most expensive.
Getting web hosting is pretty simple. Let’s take SiteGround for example. Head over to SiteGround hosting page and click the Sign Up button and pick your hosting package.
Click Order Now on the package that you want to purchase. Next, SiteGround will ask if you already have a domain or you want to register a new one.
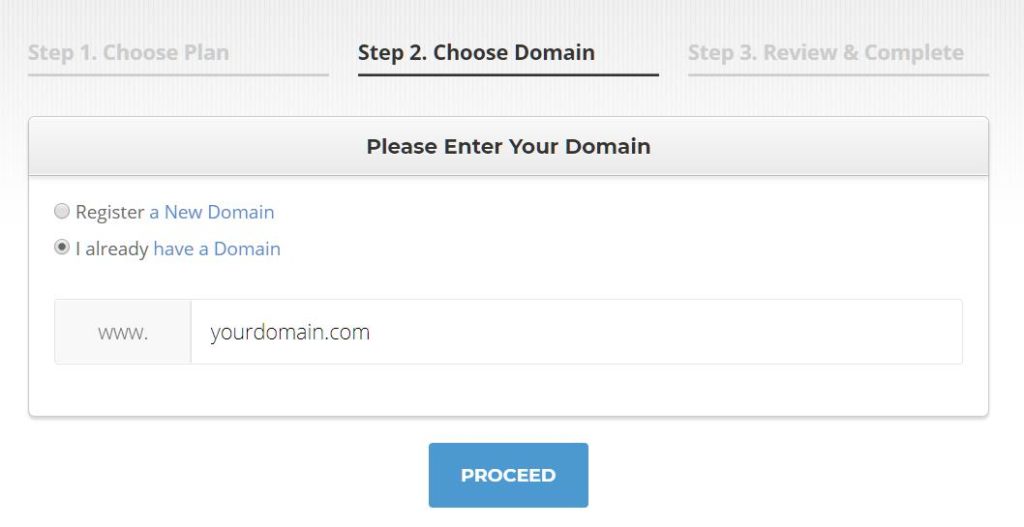
Since you already purchased a domain in the first step, select that you already have a domain, enter your domain name and click on the Proceed button.
You’ll be taken to an order form to enter your billing details and complete the signup process.
SiteGround may try to sell some additional services, but buying them or not is totally up to you. They are not required to follow this guide and build your website.
Step 3: Add Custom Nameservers
I know this sounds somewhat technical, but stay with me. It’s really easy. So far you have purchased the domain and hosting, but you haven’t connected the two. That’s what we are going to do in this step.
Once you have checked out, your host will email you the login details to your hosting account, as well as the nameservers required to connect your domain with the hosting account.
Nameservers are basically URLs which consist of an identifier followed by domain of your host. If you have purchased hosting from SiteGround for example, your nameservers may look like this:
- ns1.siteground.com
- ns2.siteground.com
Take a note of these nameservers and head to your account with the domain registrar. If you have purchased domain from NameCheap for instance, then you’ll see the link to manage the domain in your account.
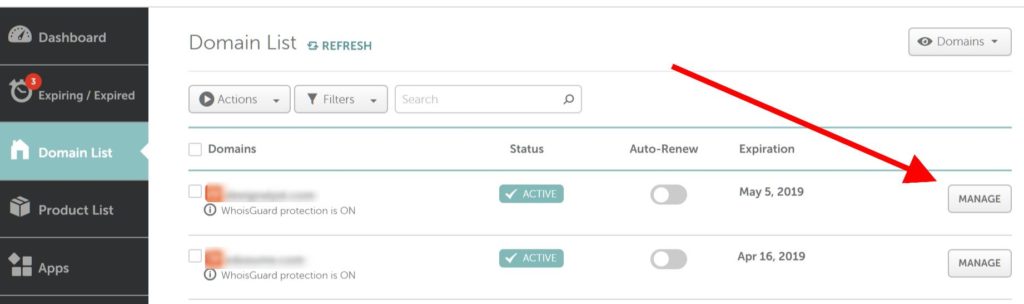
Click “Manage” and then scroll down to get to the nameservers section.
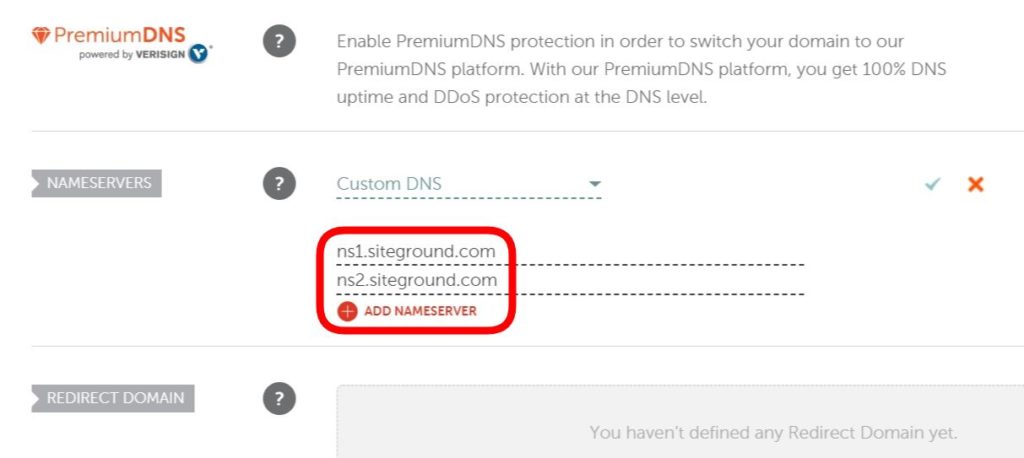
Here, select “Custom DNS” from the dropdown, enter the nameservers provided by your host, and click the tick mark to save. Here’s a quick video that explains the process in detail if you’re stuck.
It may take up to 48 hours for the nameservers change to take place, but you have successfully pointed your domain to the hosting you bought.
Step 4: Install WordPress
WordPress is the most popular website creation and management system, currently used by around 30% of all the websites in the world.
The growing popularity of WordPress is well-deserved. Not only is it free, but also makes really easy to build and maintain a website, and it can be extended with any features you need by installing enhancements we call “plugins”.
Plus, there’s a widespread community of WordPress users all over the world. So anytime you run into any issue, chances are someone has already faced and solved that problem. So the solution is just a Google search away.
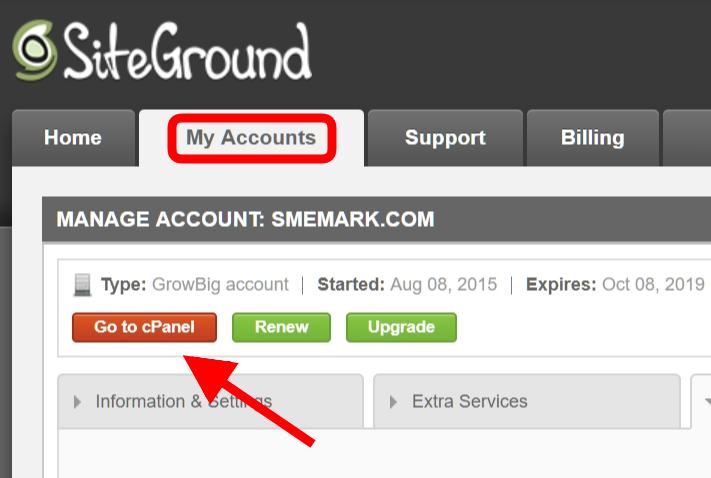
Installing WordPress on your hosting is really easy. On SiteGround, for example, login to your hosting dashboard or user area and click on the My Accounts tab. Then click Go To cPanel.
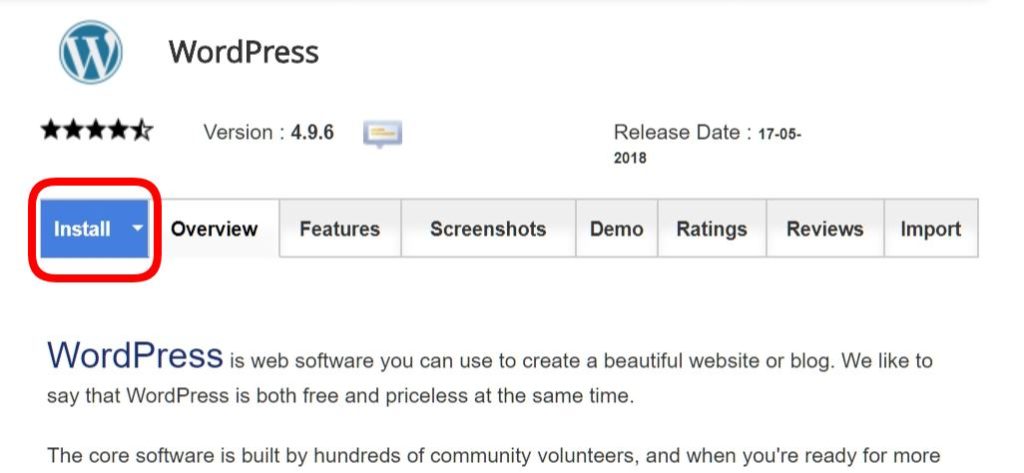
Once you’re in the cPanel, scroll down and look for the icon to install WordPress.

On the next screen, click on the Install button and you’ll see the WordPress installation form.
Choose a protocol. Default should be https://. That’s because SiteGround provides you with free SSL certificate for a year, which you should definitely install. Here’s how you can do it.
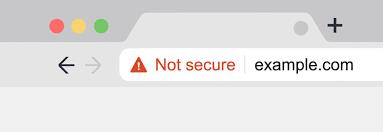
An SSL certificate is basically a security badge which shows how trustworthy a website is, especially if you’re going to accept payments. And a free SSL certificate for a year is great because SSL is one of the new search engine ranking factors.
So a website domain name which starts with https:// is more likely to rank higher in search engines than the one without it. Plus, if your website is not https://, it will be shown as “not secure” in the Chrome address bar, which can turn away some visitors.
Once you have chosen a protocol, select the domain name you purchased to install WordPress. You can leave the directory field blank.

You’ll also see some fields to type in your blog title, username, email etc. Don’t worry about the title for now, as you can easily change it later.
But note that the username, password and email you set here is going to be used to login and manage into your WordPress website.
The username and password you typed earlier when purchasing hosting was for your hosting account, which is not the same as your WordPress admin account.
Leave the other fields as they are, and then click the Install button. Wait for a few seconds for it to complete, and your WordPress installation will be ready.
In fact, now you can even try accessing your website by typing your domain name in the address bar of your web browser. And you’ll see that it works. Your website is now live on the Internet!
Step 5: Login To WordPress Dashboard
Although your website is now up and running, it may not look anywhere near to how you want it to be.
This is because it’s based on a default theme that already comes bundled and installed with WordPress. And you haven’t customized it to your needs. So that’s what we are going to do moving forward.
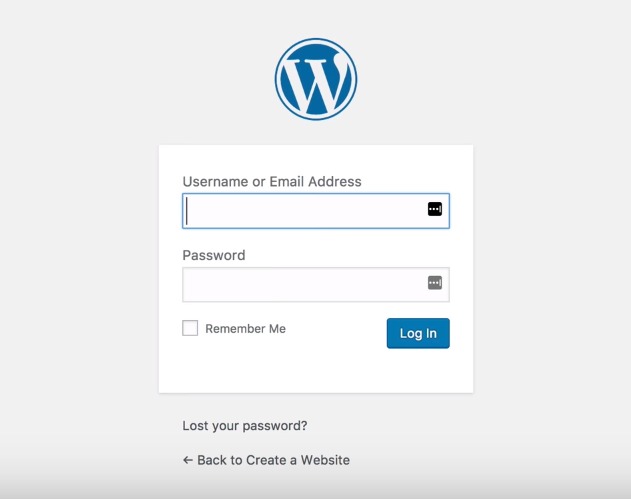
To get started, you’ll need to login to your WordPress admin dashboard. If you have followed the exact instructions so far, you can access the dashboard by typing this in the address bar of of web browser.
http://yourdomain.com/wp-admin
Once you’re there, you’ll be prompted to login using the username and password you entered at the time of installing WordPress.
After you login, you’ll see the complete interface you’re going to use from time to time to change, manage and add content to your website.
This is called your WordPress admin dashboard. Don’t worry if it looks a bit intimidating at first. Once you get a hang of it, it’s really simple, and fun too.
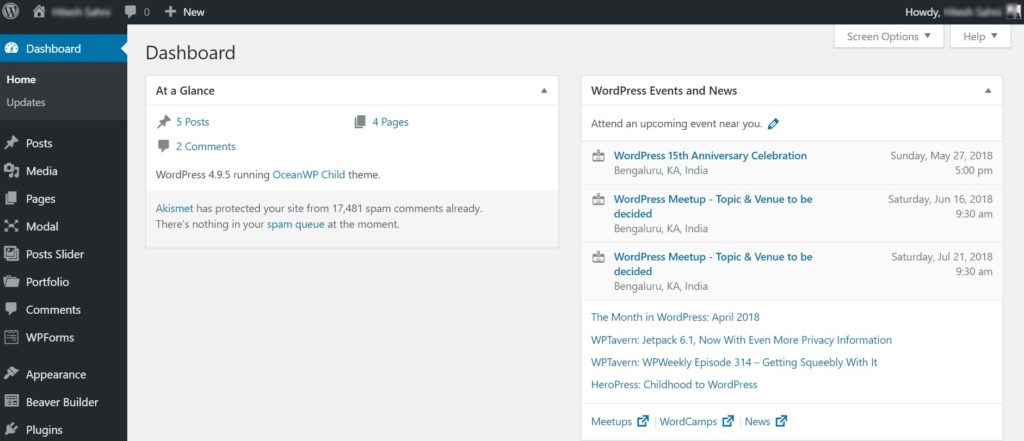
You may also see some plugins already installed and some extra notifications caused by them, but don’t worry about that right now. We’ll discuss about both themes and plugins in the next steps.
Step 6: Install A WordPress Theme
A theme is what defines the overall look and feel of your WordPress website. And the good news is that because WordPress is so popular, there are thousands of themes available for it, both free and paid.
But the bad news is that most of the themes (even some bestsellers) are poorly coded, bloated with unnecessary features and complicated to customize. So if you’re not careful, it’s more likely that you’ll pick a bad theme, based only on how nice and fancy it looks.
That’s why for this tutorial, we’re going to go straight to the best – OceanWP theme. It is coded with respect to WordPress coding standards, optimized for speed and SEO, easier to customize, looks stunning and has a whole lot more.
And here’s the real kicker: as a theme which packs a lot more value that many premium themes put together, it’s absolutely free.
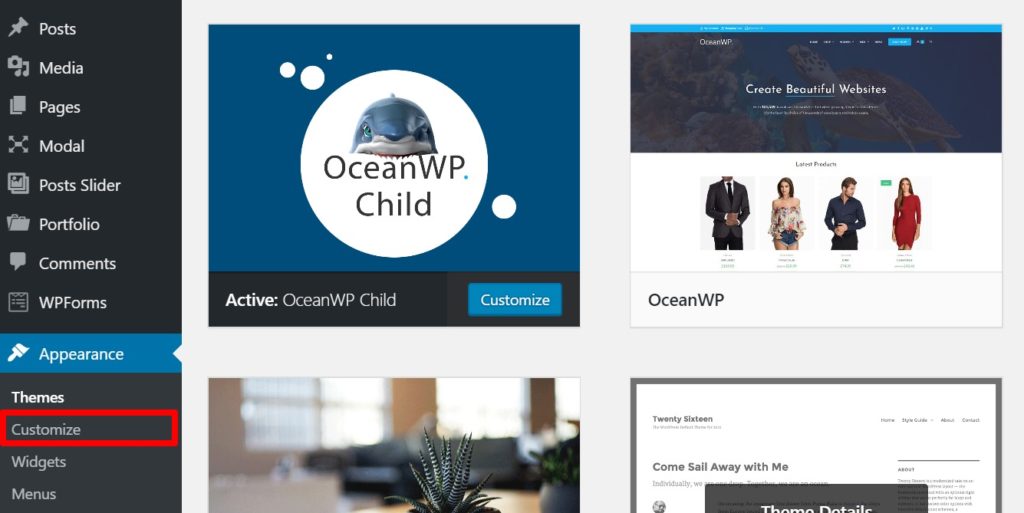
To install the OceanWP theme, just click on Appearance > Themes from the left menu in your WordPress dashboard, and then click Add New.
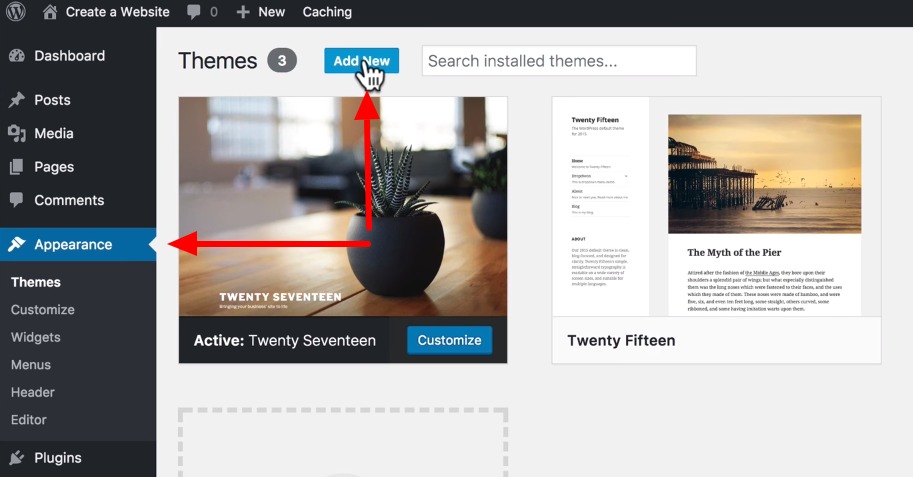
Once you’re there, type OceanWP in the search bar and press enter. You’ll be able to see the option to install the OceanWP theme.
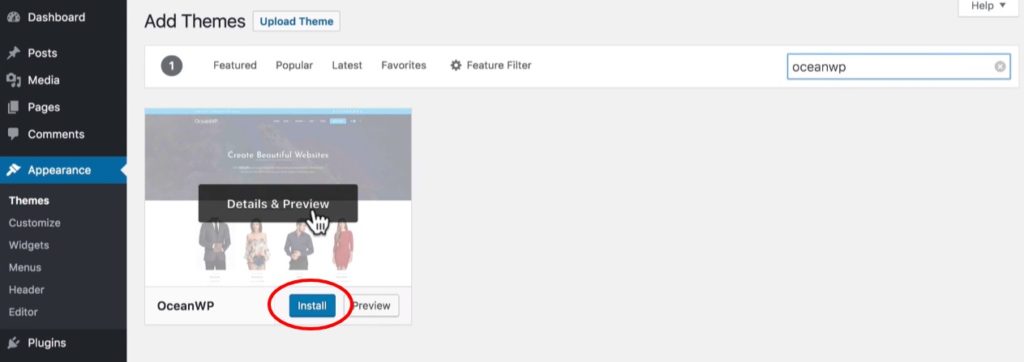
Hover over the theme with your mouse pointer, and click Install. And then click Activate to make the theme active on your website.
Step 7: Install Essential Plugins
Just like there are thousands of themes available for WordPress, so are plugins. While a theme determines the look and feel of your website, plugins add new features and functionalities.
With a plugin, for instance, you can add a contact form on your website, block spam comments, or implement a shopping cart. The list is endless.
When you installed WordPress and logged into your WordPress account in step 5, you may have noticed that some plugins are already installed.
Click on Plugins in the left menu to see the full list currently installed plugins.
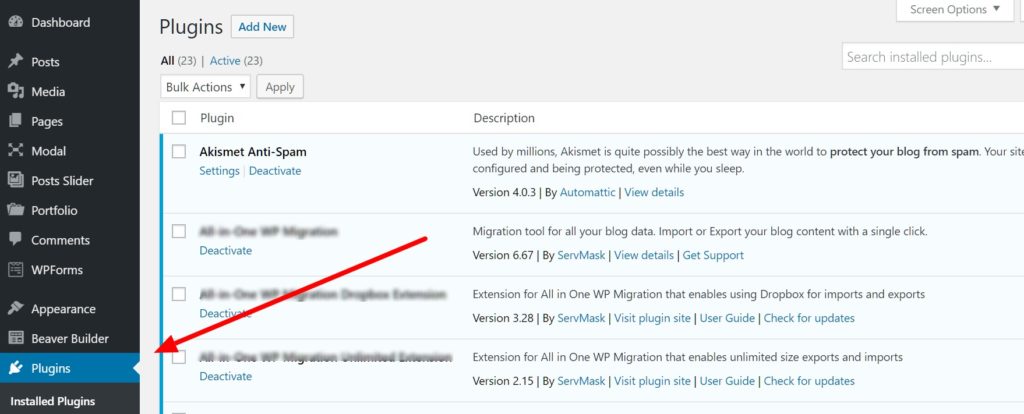
For our purpose, you can safely remove those plugins as it’s wise not to have any more plugins than what you really need for the website. To remove a plugin, click on Deactivate link next to the plugin name, and then click Delete afterwards.
Once you have deleted the unnecessary plugins, the next step is to install the essential ones recommended by the OceanWP theme.
Since you installed and activated the OceanWP theme, you should be seeing the recommended plugins notification at the top.
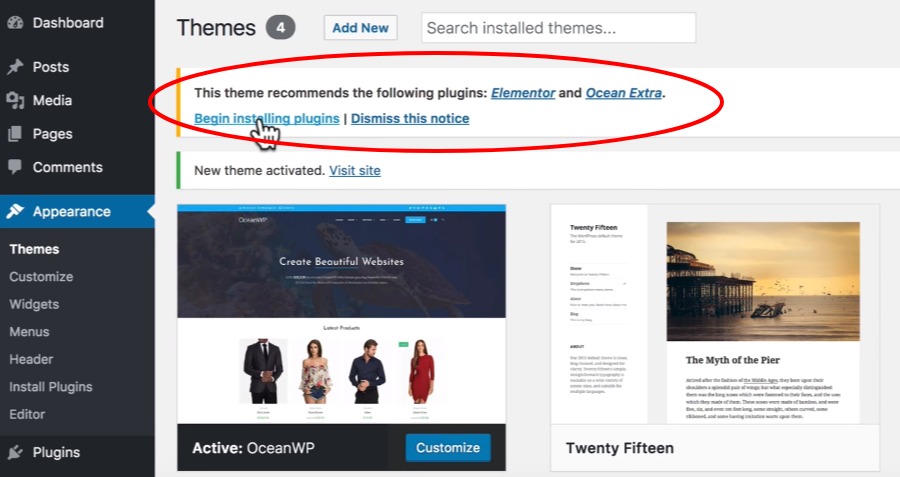
The OceanWP theme recommends Elementor (the best free plugin to design professional looking web pages without coding) and Ocean Extra (a free plugin required for some of the theme features to work).
From there, you can click on “Begin installing plugins.” Then install the activate the plugins.
Step 8: Start Customizing
Now that you have installed and activated the base theme and plugins, you’re ready to start making the website your own.
One of the best things about the OceanWP theme is the powerful customizer panel. In here you’ll be able to customize your website dramatically without touching any code.
In your WordPress dashboard, go to Appearance > Customize to get to the customizer panel.
To change the website title and tagline, for instance, head over to Site Identity, as shown in the above image, and there you can change your site title and tagline.

Let’s add a logo too. If you don’t already have a logo, you can create one for free with a tool such as Logo Garden.
In the customizer panel, click on Header, and then Logo.
Upload the logo, and on the next screen, select Skip Cropping to get the whole logo. Then do the same for retina screens, but keep in mind that retina logo should be twice the size of normal logo. You can also watch this video for better understanding.
Next, let’s choose the primary colors for your website. In the customizer panel, go to General Options > General Styling. The primary color you pick here, will be the default color for elements like links and buttons in your website.
Similarly, you can pick your desired font styles from the Typography section on the customizer panel.
Also, the OceanWP theme comes with a top bar enabled by default. This is really useful if you want to show additional navigation at the top.
For a simple website though, a single menu is enough, which we will get to later. So for now, you can disable the top bar if you want.
In the customizer panel, go to Top Bar > General. Here, you can uncheck the box to disable the top bar, or leave it checked if you want it enabled.

Once you’re done with the changes and want to save them, just click the blue Publish button at the top.
There are hundreds of settings in the customizer panel that you can use to change the look and feel of most parts of your website, without touching any code or CSS. We encourage you to play around with the customizer, where any change also happen in real-time.
Step 9: Change Permalink Settings
You can keep on customizing over time as you work on other parts of the website and notice things that need to be changed.
But for now, the website is currently blank, as it doesn’t have any posts or pages. So let’s work on creating some essential pages.
Before you create a page or post in WordPress, you may want to change the permalink settings. This is because by default, your page and post URLs will be generated like this:
yourdomain.com/?page_id=435
yourdomain.com/2018/05/19/sample-post/
yourdomain.com/?page_id=821
Clearly, this is neither visitor-friendly nor good for search engines. It’s much better to have your post and page URLS like this:
yourdomain.com/contact/
yourdomain.com/marketing-tips/
yourdomain.com/about-me/
To make sure you can create such user-friendly URLs for your posts and pages, this happen, go to Settings > Permalinks in your WordPress dashboard.
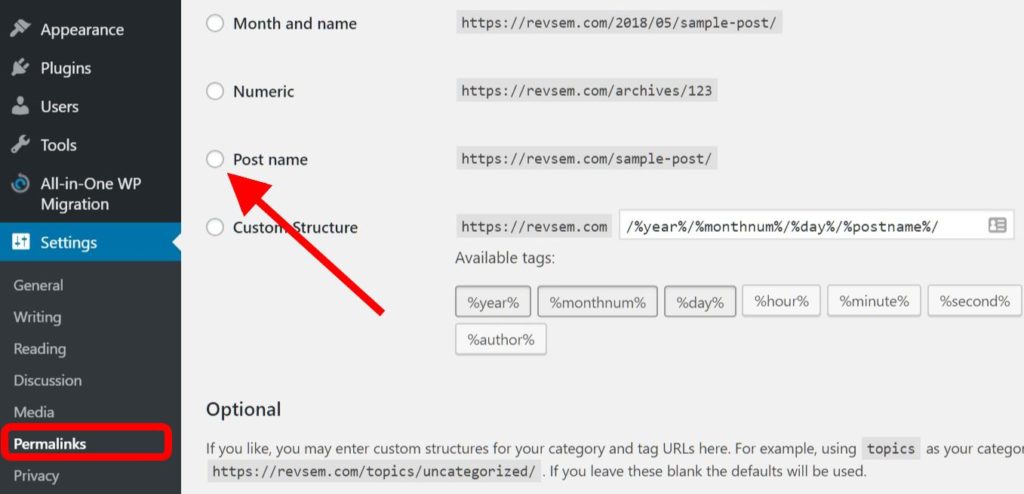
Once you’re there, select the Post Name radio button, and click Save Changes.
Now, whenever you create or edit a page in WordPress (which we’ll talk about in the next step), you can set your own easy-to-remember and relevant URL.
Step 10: Creating/Editing Pages
Now, the standard way to create a page in WordPress is to click Pages > Add New in your WordPress dashboard.
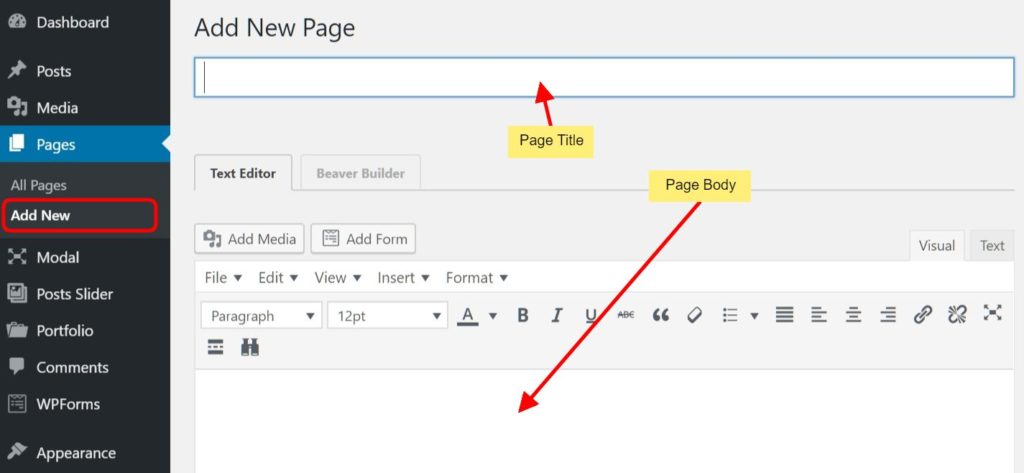
Next, you’re going to see the WordPress text editor interface, which is a bit similar to word processing programs like WordPad or MS Word.
Here, you can give your page a title. And you can add your content, including text, images and more in the body section.
Once you’re done adding your content, hit the Publish button on the right to activate your page.
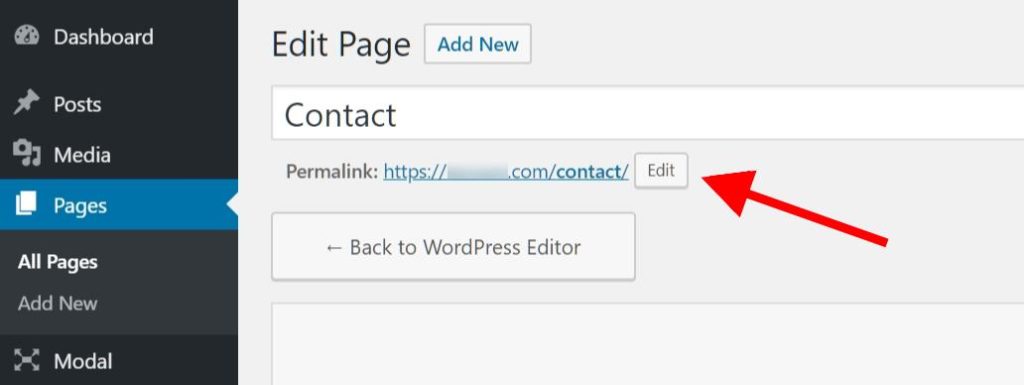
Editing your existing pages is just as easy. Go to Pages > All Pages to view a list of all the pages you have created so far.
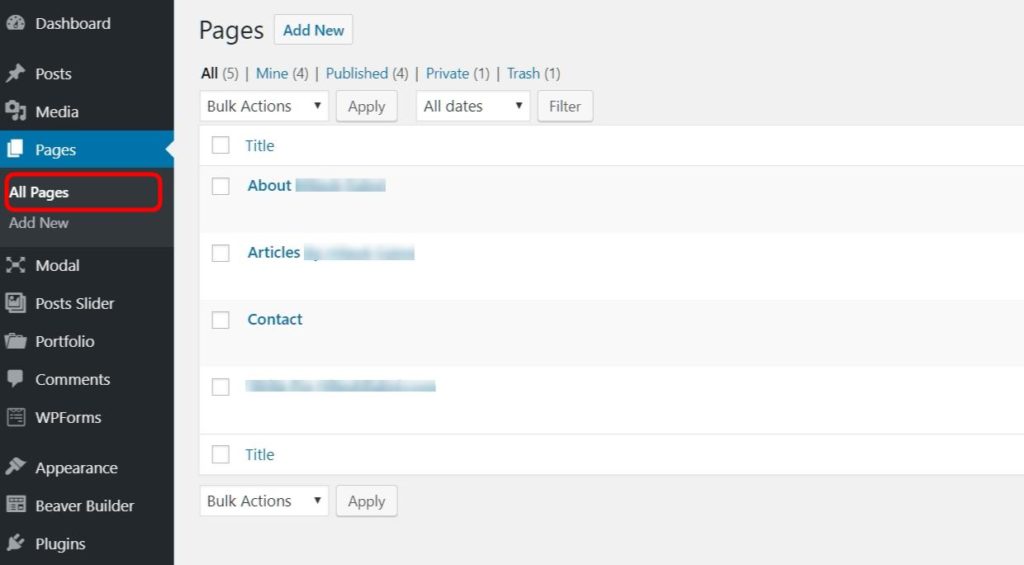
Hover over the title of the page that you want to edit, and click Edit. You’ll see the same interface that you saw when creating a page. Make the changes as you want, and then click the Update button to save the changes.
Now, you can create and edit as many pages as you want with this approach, but the problem is that all you pages will have the same overall design. Each page will be a title, followed by chunks of text, and some images may be.
But as promised, the aim of this guide is to show you how to create professional and beautiful pages like a pro. And that’s what we’re going to do next.
Step 11: Importing An OceanWP Demo
The free OceanWP theme comes with several pre-built demos, many of which are free to import.
A demo is a sample website, with some pages already designed according to needs of businesses in a specific niche, business model or just the designer’s creative tastes.
So if your needs fall under the category which the demo is meant for, or you really like how it’s designed, you can make your website look and feel exactly like the demo. And you can do this in just a few clicks, without any coding.
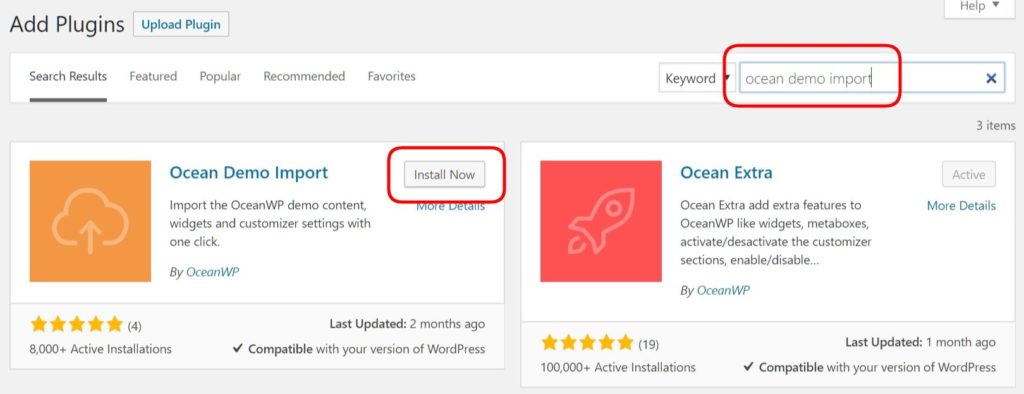
So head over the the OceanWP demos page, and decide on which demo would you like to use for your website. Once you’ve done that, the first step is to install the OceanWP demo import plugin.
In your WordPress admin dashboard, go to Plugins > Add New and search for “Ocean Demo Import.”
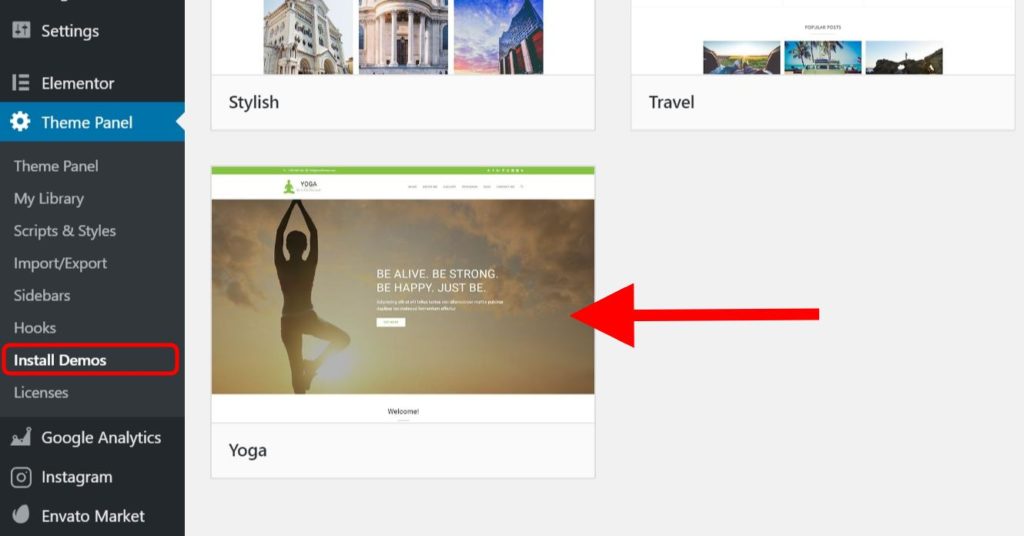
Then install and activate the plugin. Next, go to Theme Panel > Install Demos. Look for the demo which you want to import, and click on it to view it’s requirements.
For instance, let’s say I want to create a website on Yoga. Now, there’s a free demo available in OceanWP exactly for this purpose.
Even if none of the available demos mention your industry or purpose, there’s no need to worry. Just pick the one closest to your needs and preferences in terms of overall design, and then you can modify the pages later.
Click on the demo you want to import and a popup will show you the plugins that you need to install before importing the demo you have clicked. Here’s what I see when I click on the Yoga demo, for instance.
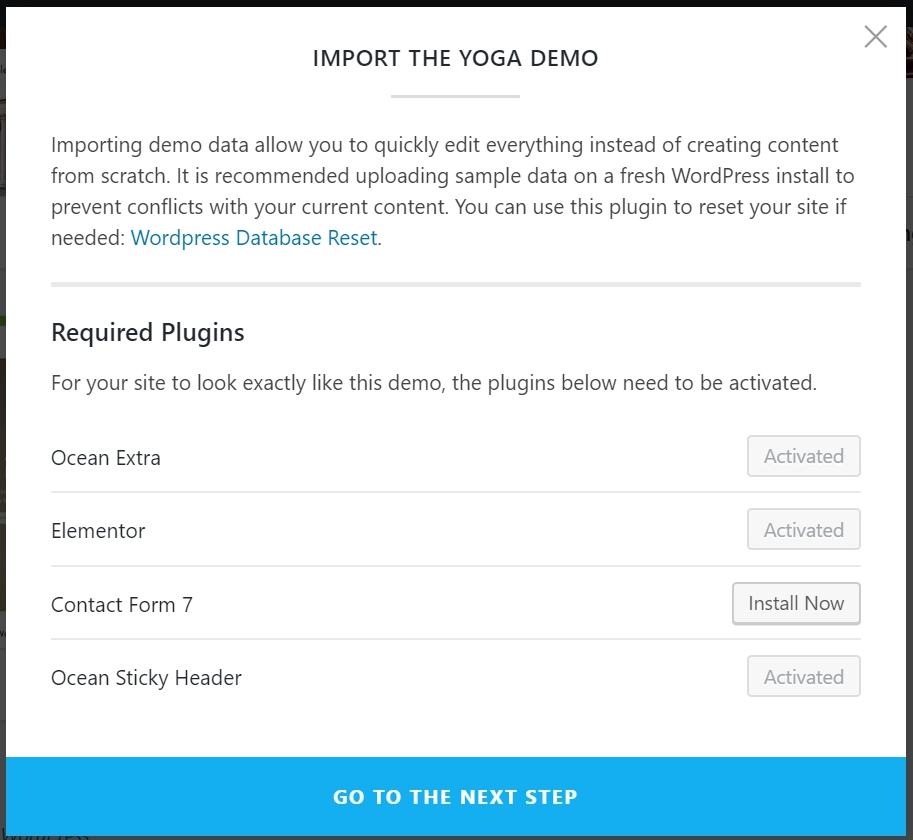
So before you import this demo, you’ll need to click on the buttons next to each of the plugins to install and activate those plugins.
If a required plugin is not available for free, you can either purchase it, or proceed without installing that plugin. Here’s a video which will make the process even more clear.
After activating the plugins, click Go To The Next Step button.
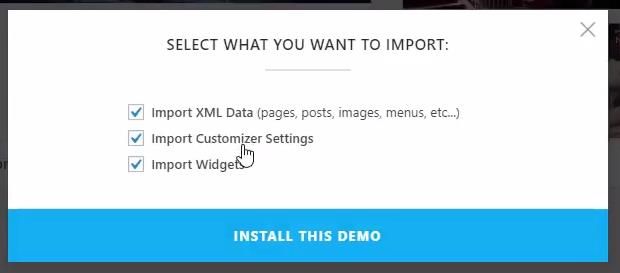
On the next popup, you can pick what settings you want to import, or simply leave everything checked and click Install This Demo button.
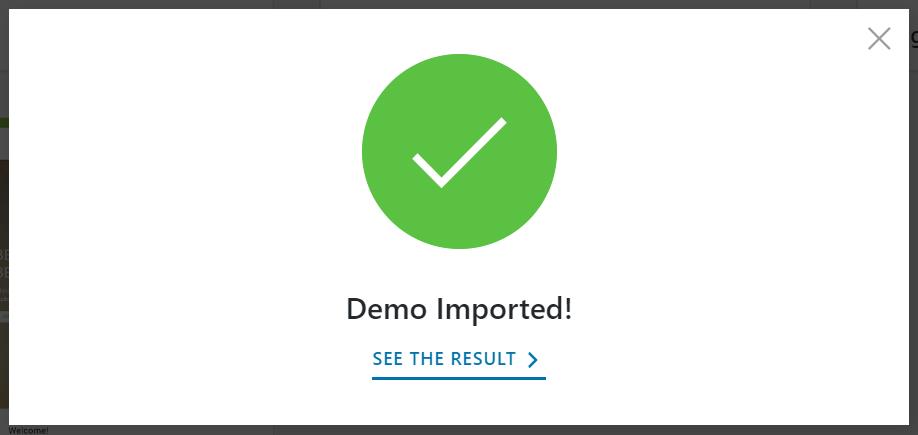
Wait for a few minutes to see the success message, and it’s done. Now you can load your website to see the pages in action.
Step 12: Creating Pages With Elementor
Importing a demo will save you a lot of time. You’ll get many ready-made pages for your website. But based on your needs, you’ll want to edit the content of those pages, or create some more.
So going forward, we recommend you to get acquainted with Elementor, the free page builder plugin we installed in one of the previous steps.
To edit the pages you got from the OceanWP demo import, go to Pages > All Pages in your WordPress dashboard to view a list of all your imported pages.
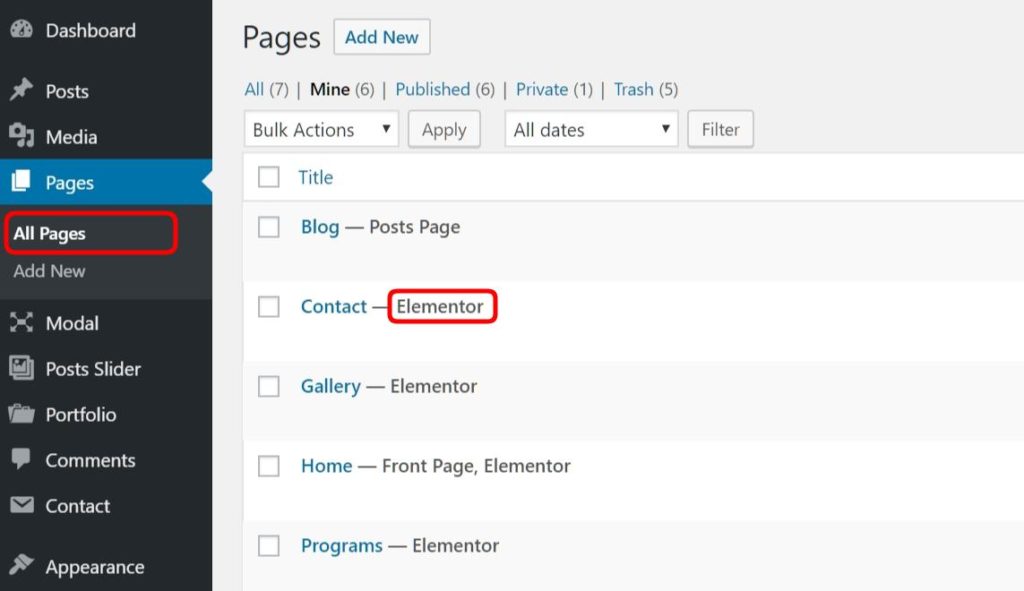
When you see the label “ – Elementor” next to a page title, it means that the page has been created or edited with Elementor.
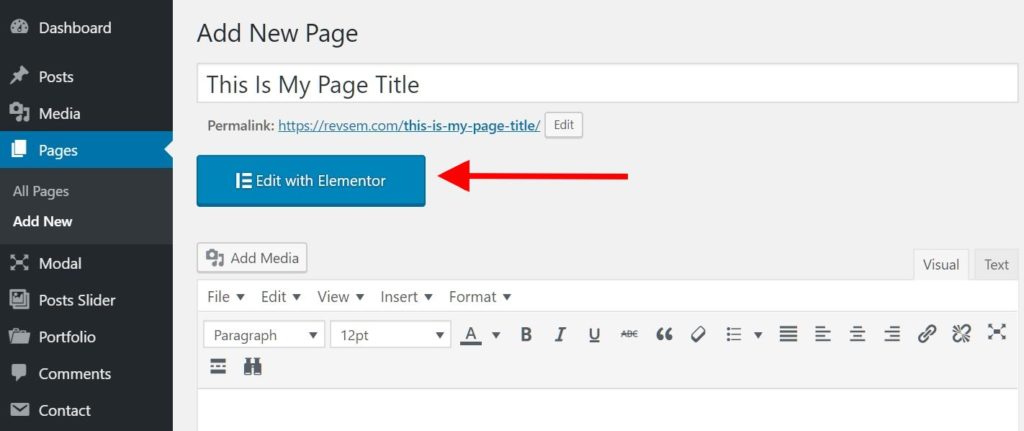
To edit a page, hover over the page title in the list, and you’ll see a link which says Edit With Elementor. Once you click on that link, you’ll see an interface like this:
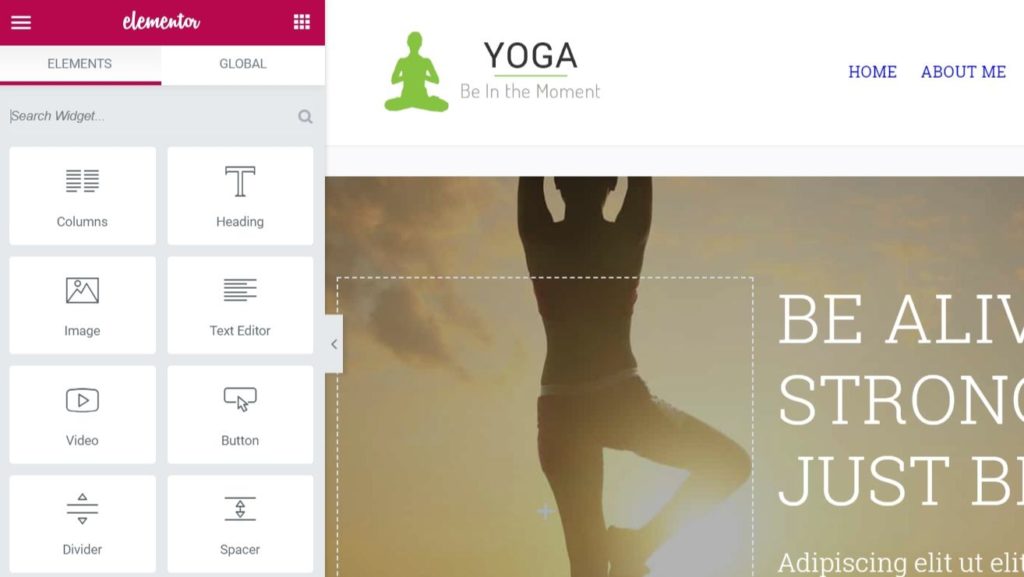
On the left, you have the elementor controls to customize the page. And on the right is the page you’re editing, to which you make changes in real time.
Creating a page with Elementor is also a similar process. Just go to Pages > Add New. Give your page a title.
By default, the width of the page will be what you have set in your WordPress customizer panel. If you want to create a page which takes the entire width of the screen, scroll down to OceanWP Settings and click on the Main tab.
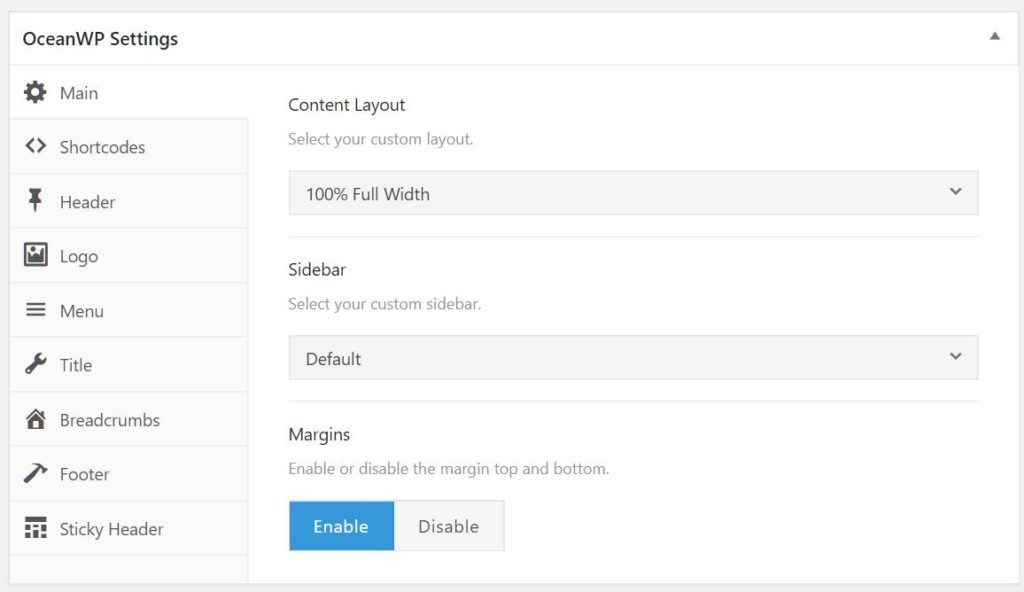
Then, in the Content Layout section, click on the dropdown and select 100% Full Width. Next, click Save Draft or Publish button from the right to save your changes.
To start building your new page, click on the blue Elementor button below the page title and you’ll get the same page editor interface we saw earlier.
Elementor is a powerful page builder with lots of features and additional templates that you can use to create new pages, without touching any code.
So a full tutorial is beyond the scope of this guide. But it’s really quick to grasp and intuitive to use. This video can help you get a hang of it and start editing pages in no time.
Step 13: Setting Your Homepage
Also note than just creating a page with the title “Home” will not make it the homepage. By default, WordPress shows the page with your latest blog posts as the homepage.
If you import one of the OceanWP demos, then the homepage in that demo will automatically be set as homepage. So you don’t need to do anything.
But if you’re creating a page on your own, or want to set another page as the homepage for your site, then you’ll need to modify a setting in WordPress.
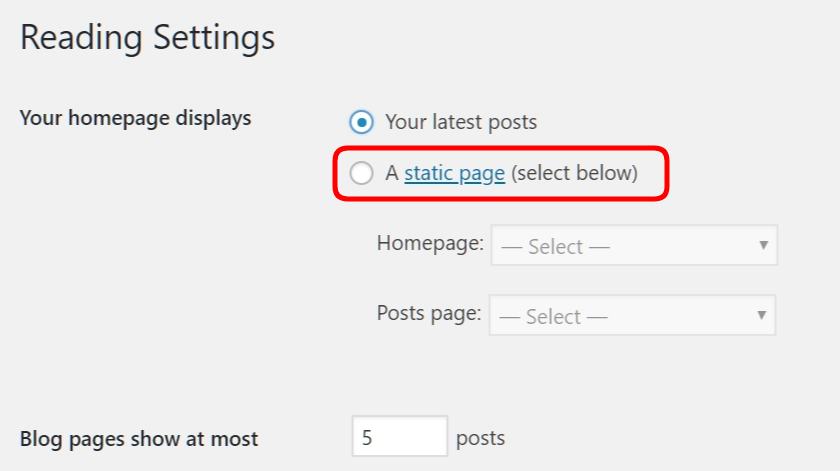
To change this, go to Settings > Reading. Then select the option – a static page. In the homepage dropdown, you’ll see a list of all the available pages.
From here, you can select the page that you want as your website homepage. Then click the Save Changes button and it’s done.
Step 14: Edit Your Menu
Once you have created the basic pages on your website (like Home, About, Products, Contact or more), the next step is to configure your navigation.
You want to make sure there’s a menu at the top of your website, which can lead the visitors to different pages and make it easy for them to find their way.
In your WordPress admin dashboard, go to Appearance > Menu.
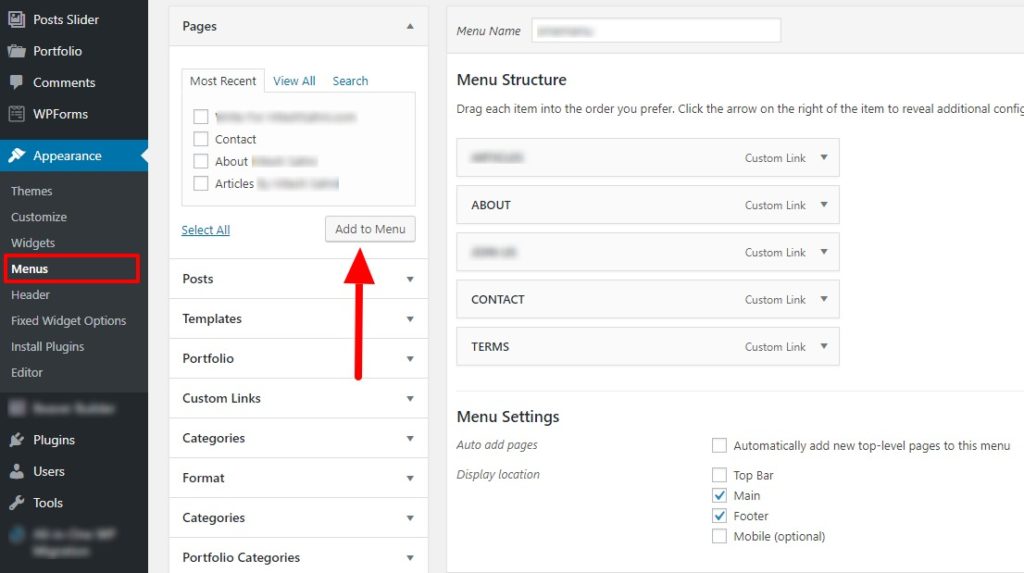
Here, you can either make changes to the existing menu, or create a new one. Give your menu a name, and check the boxes from the left associated with pages you want to add to the menu.
Then, click the Add To Menu button to add those pages to the menu. To remove a page from the menu, click on the menu item you want to remove, and then click Remove.
Below the menu items, you also see menu settings. Here you can select at which locations you want the current menu to show. If you want the same menu to show up in the header, footer and mobile, for example, you can check all those boxes.
Once you’re done with the changes, click Save Menu. You can now see the menu in action on your website.
Conclusion
Up until the last couple years, building a beautiful and functional website had been solely under the control of professional web designers and developers.
Of course things got a little easier with WordPress and hundreds of ready-made templates you can use with it.
But a good deal of custom programming was still required to make a website or blog more professional and tweak parts to look and feel exactly like you want.
The good news is that WordPress themes like OceanWP and page builders like Elementor have really leveled the playing field in 2018. And with hundreds of ready-made templates to create any type of page imaginable, there’s no excuse to not create a great website or blog.
It’s a worthy endeavor that not only builds your technical skills, but also gives deeper satisfaction and meaning that comes from sharing who you are and your work with the world.

Related Articles