While there are plenty of digital painting and illustration apps out on the market today, one that regularly rises to the top amongst the creative crowd is Procreate. With an intuitive interface and (let’s be honest) a cheap price tag, this iPad app is one of my favorites. It empowers artists everywhere to take their digital sketches on the go.
In this article, I’ll go over Procreate’s key features, recommend some of my favorite Skillshare classes to familiarize you with the app, and introduce ways to incorporate it into your workflow.
Procreate is a digital painting app designed exclusively for mobile, which means it’s been optimized for you to start sketching whenever the mood strikes. To use the app, you’ll need to have access to an iPad and an Apple Pencil and download the app from the Apple Store.
The app is most known for having an intuitive workflow, where designers navigate through brush libraries, layers and effects using finger gestures and customized Apple Pencil strokes. You can easily save, organize and export your artwork in a variety of file formats. I use Procreate for most of my designs.
Toggle between Procreate and other apps to craft vectorized designs and manage final tweaks. by Fe Melo
Here’s a look at a few of the key features:
Import & export files
Procreate can easily be incorporated into your existing workflow. The app supports most major image formats, so you can bring in photos and existing design files to tweak within the app.
If you want to finish your piece up on a desktop computer, you can export it as a layered PSD file and make the final touches in Photoshop.
If you need to vectorize your drawing (maybe you’re working on a logo, pattern or hand lettering), you can switch off the background layer in Procreate and export the artwork as a PNG. Then simply open the file in Adobe Illustrator and convert it into a vector using Image Trace.
Experiment with brushes
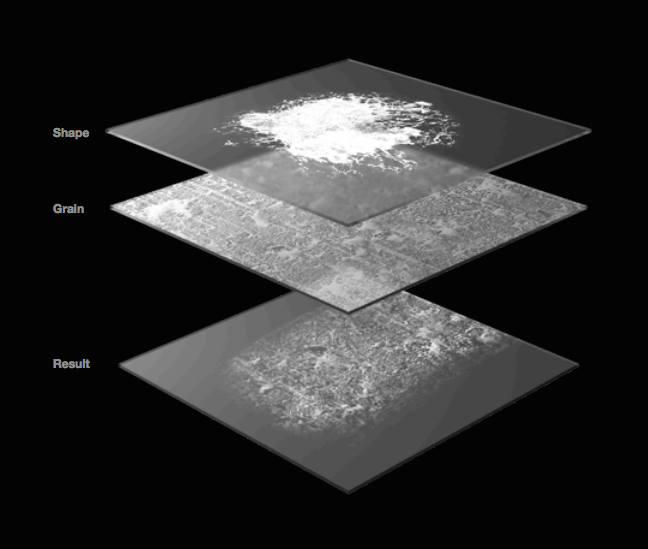
Mix and match the Shape and Grain to create your own custom brushes. Image via the Procreate Artist Handbook.
Procreate has a well-stocked library of more than 130 brushes, so you should be able to find some brushes that suit your style.
Each brush is split into two elements: Shape and Grain. The Shape is the container that houses the Grain. The Grain is what’s rolled onto the canvas (anything from a basic pattern or texture to an imported image or photo).
Once you get comfortable with the default library, the real fun starts. Each brush is comprised of 52 editable settings, including dynamic settings based on things like the speed of your stroke and your applied pen pressure.
From there you can customize the way you want to blend paint colors and build up opacity, charge your brush to naturally run out of paint, and experiment with other techniques.
Like most digital painting apps, Procreate alleviates many of the common issues you typically hit when putting pencil to paper.
Mistakes can be fixed by simply hitting “undo” or deleting a layer. Small inconsistencies can be manipulated or wiped away using a variety of filters. The StreamLine feature ensures your strokes are smooth and stabilized (this is great for designers who want their lettering to look flawless).
You can also ditch the time-consuming process of building out vanishing points and complicated guidelines by hand. If you switch on the Drawing Guides mode, you can build out snappable grids for all kinds of perspectives. The QuickLine feature lets you snap your strokes into straight lines with your finger, while Drawing Assist will constrain your strokes to the 2D, isometric or perspective guide you’ve created.
Show off your creative process
Let’s be honest… This feature is the crowd favorite by far.
You can switch on Time-lapse recording to create high res, time-lapse videos of your process from initial sketch to final piece. If you want to make a few fixes discreetly, just pause the recording and turn it back on when you’re ready.
Once it’s ready, import your time-lapse into a video editing app to add music, edit the clip and add your personal branding. Then share it with the world!
If you’re building out a professional brand or looking to gain more exposure, consider making these kinds of videos a staple on social channels like Instagram and YouTube. It’s always inspiring for fans (and prospective clients) to see how the pros create their artwork.
Ready to dive in?
_
I’ve rounded up some of my favorite Skillshare classes to get you up to speed, with the hope that you’ll learn some new styles and skills that you can apply to your own work.
This course was definitely one of my favorites. I’ve always liked Jarom Vogel’s style, so it was awesome to see his illustrations come to life—and to see how he uses Procreate as a tool to do that.
Learn how to use the app tool-by-tool and achieve some really cool effects by using different layer modes. Brooke’s background is in children’s apparel and greeting cards—and I love her cutesy style.
If you love pen and ink, this class is for you. You’ll create a decorative monogram, while learning how to set up your canvas, create basic shapes and outlines, and how to color it in with added details and shading.
Learn hand lettering basics and how to achieve trendy effects including watercolor brush and ombré lettering. You’ll also be introduce to some of the new tools added in Procreate’s latest update.
New to Skillshare?
Get two months free access with the promo code 99designs2Months
Fernanda Melo Stark is a freelance illustrator and graphic designer, with a background in textile and fashion design. You can find her in the 99designs community as Fe Melo. Read more about Fernanda in our blog interview.